Scripts with Blockly and JavaScript
How do I control WLED with JavaScript, periodically or step by step (for example a sunrise)?
This section is still being written.
How do I find WLED states in the script selector through the role switch.light?
This section is still being written.
How do I build garage door lighting with WLED presets?
This section is still being written.
How do I switch WLED off automatically after a while (timer)?
In short: There are two ways. Either your script starts a timer when the light is switched on and writes false to wled.0.<MAC>.on when the time is up. Or you use the WLED nightlight (nl): then the device counts down by itself and switches off, even if ioBroker isn't running during that time.
For the adapter, switching off is just a normal write to on. The timing logic belongs in the script. What matters is that you clear a running timer and start it again when it is triggered again, instead of working with pauses.
Timer in Blockly
- Add an "Event: if object" block and select
wled.0.<MAC>.onas the object. Set it to "was changed". - Inside the block, check whether the value is
true. - Inside that, add the "control" block for
wled.0.<MAC>.onwith the valuefalse. Enable "with delay", enter the time (for example 10 min) and tick "clear running". - This way, every new switch-on starts the timer from the beginning. Switching off by hand before the time is up does no harm: the timer then writes
falseto a light that is already off.
Timer in JavaScript
const WLED = 'wled.0.<MAC>';
const DURATION_MS = 10 * 60 * 1000; // 10 minutes
let offTimer = null;

// WLED reports: light is on (no matter whether switched on via VIS, app or button)
on({ id: `${WLED}.on`, val: true, change: 'ne', ack: true }, () => {
    if (offTimer) clearTimeout(offTimer); // restart a running timer
    offTimer = setTimeout(() => {
        offTimer = null;
        setState(`${WLED}.on`, false); // control command (ack=false)
    }, DURATION_MS);
});

// If it is switched off by hand, the timer is no longer needed
on({ id: `${WLED}.on`, val: false, change: 'ne', ack: true }, () => {
    if (offTimer) clearTimeout(offTimer);
    offTimer = null;
});
ack: true in the trigger means: the script reacts to the feedback from the device, not to your own command. change: 'ne' makes sure that only a real change starts the timer.
WARNING
Up to v0.9.2 the adapter sets on to false as soon as a device goes offline, and when the adapter starts. A script that reacts to on is therefore triggered even without any real switching. From v0.9.3: on and bri keep their last value when the device goes offline and when the adapter starts; the real values come from the device when it reconnects (#899).
If the device is offline when the timer runs out, the command doesn't arrive. The adapter doesn't buffer anything. From v0.9.3 the log then shows the warning "Device … is offline, command for … discarded" (#904). If switching off must work reliably, use the nightlight.
Timer with the WLED nightlight
The nightlight runs on the device. For it, the adapter creates these states under wled.0.<MAC>.nl:
| State | Meaning | Writable |
|---|---|---|
nl.on | Start (true) or cancel (false) the nightlight | yes |
nl.dur | Duration in minutes, 1 to 255 | yes |
nl.tbri | Target brightness at the end, 0 to 255; with 0 the light is off afterwards | yes |
nl.mode | Mode: 0 instant, 1 fade slowly, 2 color fade, 3 sunrise | no, only via action |
nl.rem | Remaining time in seconds, -1 if no nightlight is running | no |

This is how you switch the light off in 10 minutes:
- Write
10towled.0.<MAC>.nl.durand0towled.0.<MAC>.nl.tbri. - Switch the light on if it is off, then write
truetowled.0.<MAC>.nl.on. - When the time is up, WLED sets the brightness to
nl.tbri, so the light is off.nl.ongoes back tofalse.
You can only set the mode via the action state, because nl.mode isn't writable in the adapter. With a single command you switch the light on and let it fade out slowly over 10 minutes:
{"on":true,"nl":{"on":true,"dur":10,"mode":1,"tbri":0}}In JavaScript: setState('wled.0.<MAC>.action', JSON.stringify({ on: true, nl: { on: true, dur: 10, mode: 1, tbri: 0 } }));. In Blockly, write the same text to action with "control".
See also: Send a complete JSON command · Switch presets with a motion sensor · Why on becomes false when the device goes offline · Script doesn't set ps or on
How do I show a status or a countdown on the strip?
This section is still being written.
How do I switch WLED presets automatically, for example with a motion sensor?
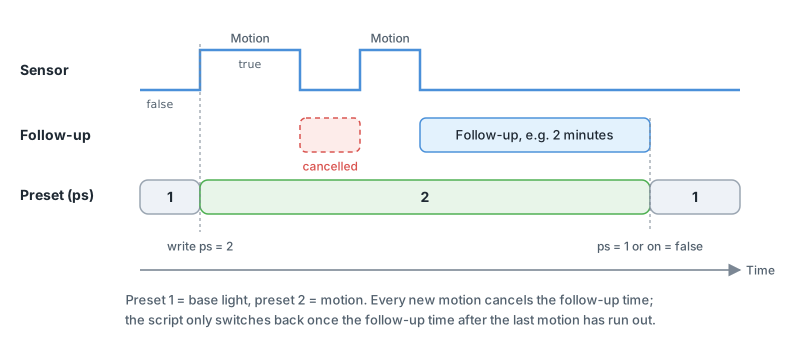
In short: The pattern is always the same: a sensor state triggers the script, the script writes the preset number to wled.0.<MAC>.ps, and after a follow-up time it switches back to another preset or writes false to on. This works with motion sensors, door and gate contacts or any other state.
The adapter doesn't do anything special here: every write with ack=false to ps or on is sent to the device right away. The logic of which preset applies when lives entirely in the script.
What to prepare
- Create the presets in WLED, for example number 2 for "motion" and number 1 for "base light". Save the "motion" preset with the light on and with "Include brightness", so that it also switches on when the light was off before.
- Look up the ID of your sensor in the object tree, for example the motion state of a Zigbee or Homematic sensor. It should report
trueon motion andfalseafterwards. - Decide how long the light should stay on after the last motion.
How ps works in detail and why a preset switches on or off is described under Switch presets via the ps state.
Example in JavaScript
const WLED = 'wled.0.<MAC>';
const SENSOR = '<ID of the motion sensor>';
const PRESET_MOTION = 2;
const PRESET_BACK = 1;              // 0 means: switch off afterwards
const FOLLOW_UP_MS = 2 * 60 * 1000; // 2 minutes after the last motion

let followUp = null;

// Motion detected: set the preset right away, cancel a running follow-up time
on({ id: SENSOR, val: true, change: 'ne' }, () => {
    if (followUp) { clearTimeout(followUp); followUp = null; }
    setState(`${WLED}.ps`, PRESET_MOTION);
});

// No more motion: start the follow-up time, then switch back
on({ id: SENSOR, val: false, change: 'ne' }, () => {
    if (followUp) clearTimeout(followUp);
    followUp = setTimeout(() => {
        followUp = null;
        if (PRESET_BACK > 0) {
            setState(`${WLED}.ps`, PRESET_BACK);
        } else {
            setState(`${WLED}.on`, false);
        }
    }, FOLLOW_UP_MS);
});
Example in Blockly
- An "Event: if object" block on the sensor, "was changed".
- Inside it, a check on the value. If it is
true: first the "clear" block from the "Timeouts" group for the timeout "followUp", then "control"wled.0.<MAC>.pswith2. - If it is
false: again first "clear" for "followUp", then the "Execution" block with the name "followUp" and "in" 2 min. Inside it, "control"wled.0.<MAC>.pswith1(orwled.0.<MAC>.onwithfalse). - This way, every new motion cancels the follow-up time, and every end of a motion starts it again. The "Pause" block is not suitable for this, because it can't be cancelled.
What to watch out for
- One trigger per state. Create only one trigger per sensor and let it call a shared function. Several triggers on the same state can interfere with each other.
- Several sensors (for example top and bottom of the stairs): in a helper function, work out from all sensors which preset should apply, and write
psonly there. A lock variable per sensor stops one sequence from cancelling the other. - The same preset again: if the preset is already active, WLED doesn't load it again. So if you switched the light off via
onin between, it stays off. In that case, send{"on":true,"ps":2}towled.0.<MAC>.action. - Device offline: commands to a device that the adapter considers offline don't arrive. The adapter doesn't buffer anything. From v0.9.3 the log then shows the warning "Device … is offline, command for … discarded" (#904).
TIP
If the light should return to its previous state after the follow-up time, remember the value of ps when the script is triggered and write it back afterwards. This only works if a preset was active before. If ps shows the value -1, none was active.
A detailed example for a garage door with several states is under Garage door lighting with WLED presets.
See also: Switch presets via the ps state · Switch WLED off after a while · Script doesn't set ps or on
How do I save the state and restore it after an animation?
This section is still being written.
How can I tell whether WLED was switched via Telegram, VIS or the web interface?
This section is still being written.